| Table of Contents | WiFi Hopper 1.2 User Manual |
Connectivity Features
WiFi Hopper can work as a replacement for the Windows built-in or manufacturer provided wireless client. The following sections illustrate how to use WiFi Hopper for various connectivity-related operations.
Basic Network Operations
WiFi Hopper can connect to unsecured, WEP, WPA-PSK or WPA2-PSK networks.
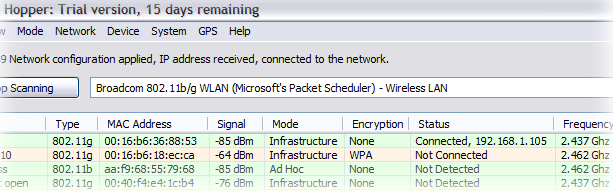
Connecting to Unsecured Networks
To connect to an unsecured network, either:
Upon any of the actions above, WiFi Hopper will:
Once the card is connected, WiFi Hopper will change the Status of the network to 'Connected' and display the obtained IP address beside it in the Status. You can obtain more detailed IP information about the connection in the Device Information Window.
Connecting to WEP, WPA or WPA2 Networks
To connect to a WEP or WPA or WPA2 network, either:
You will be prompted to enter the key or pass phrase for the network in the Network Authentication Window.
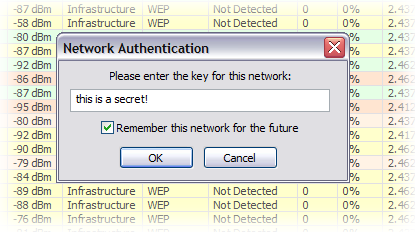
If the network has been previous saved under a profile, the key dialog will already contain the key or pass phrase for the network. Note that WEP keys must be either 5 or 13 ASCII characters or 10 or 26 hex characters. There are no implicit restrictions on the length of WPA/WPA2 pass phrases but they are usually greater than 8 characters.
Upon any of the actions above, WiFi Hopper will:
Once the card is connected, WiFi Hopper will change the Status of the network to 'Connected' and display the obtained IP address beside it in the Status. You can obtain more detailed IP information about the connection in the Device Information Window .
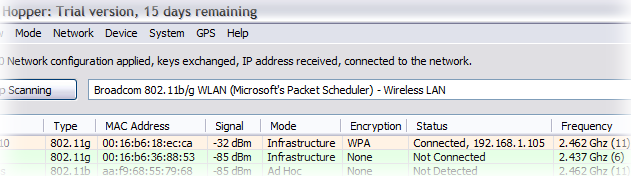
Note: When connecting to the WEP network with Open Authentication Mode (default), the interface will timeout waiting for an IP address if the network key is incorrect. This is due to the design of Open Authentication Mode.
Disconnecting from a Network
To disconnect from a network, either:
If DHCP is enabled on the corresponding interface, WiFi Hopper releases the IP address and then proceeds to instruct the networking device to disconnect from the network.
You can access the saved network profiles from View > Network Profiles...
There are multiple ways to add a network to the list of network profiles
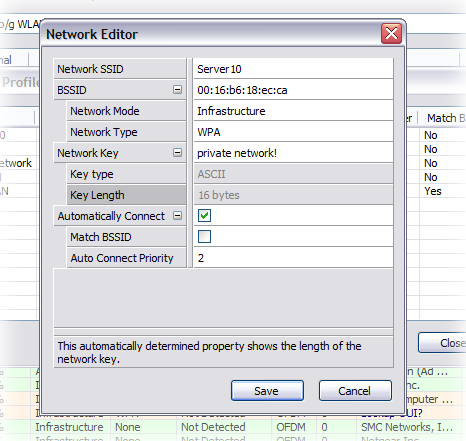
A saved network profile can be used in two ways:
To enable the Connection Manager mode, select Mode > Connection Manager from the Menu. In the Connection Manager mode, WiFi Hopper will continually scan for wireless networks. It will compare each network to each saved profile taking into account options such as Match BSSID. Once a compatible network is detected, it will continue scanning to ensure Priority is taken into account. Finally, it will initiate a connection to the most suitable network automatically without any user intervention.
Existing network profiles can be edited by double clicking on the profile inside the Network Profiles Window.
Viewing Detailed Device Information
WiFi Hopper can provide detailed device information for the chosen networking device. To access the device information, select Device > Device Information from the Menu.
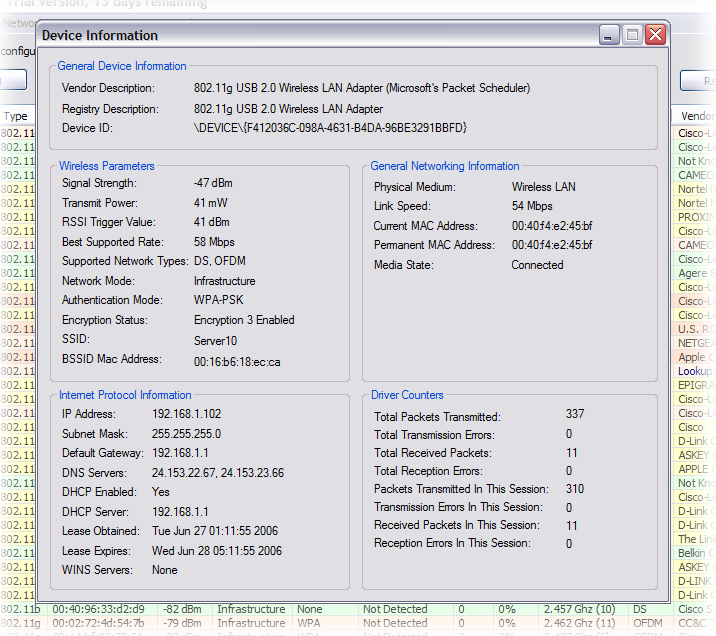
The Device Information Window will appear which provides information about wireless, non-wireless device information, IP information and miscellaneous driver counters. Note that WiFi Hopper can provide the device information even if the selected device is non-wireless. This is useful for troubleshooting.
| Table of Contents | Last Updated on May 14, 2007 © 2007 Divya Thakur |